I'm sure this is a pretty interesting project for dsPIC lovers. :-) first of all I would like to tell this is not a my own idea, Just I found a someones project on a site when I was finding a dsPIC based wave player through the Google. I had to do some modifications to get it to work. The site is http://www.uchobby.com and I would like to thanks for this wonderful project creator Mr. Bern. Here I'm going to describe the special points that you have to pay attention when assembling the circuit and compiling the code.
My modifications :
1. Used dsPIC30F6014A and dsPIC30F4011 ( I have attached two separate codes for both MCs below)
2. I have cleaned the unnecessary codes from the project.
3. I have removed the code for Serial port interfacing part. ( In this project play a predefined wave file from the Micro SD memory card. ) Don't worry I'll explain how to select a file to play by using buttons. :-)
Lets look at the schematics diagram.

This dsPIC30F6014A MCU is a surface mount type. If you don't have the SMD facilities to assemble the circuit just buy a MCU card here >> dsPIC30F6014A MCU
Actually I also bought a dsPIC30F6014A MCU card there. The cost is $24.90 USD and DHL Express charges was $25.00 USD.
dsPIC30F6014A MCU cards.

You can use few dual line IC base for make pin connections like below.
(I'll post a video related to this ASAP) :-(
you can use a bread board to assembling the circuit. My circuit look like below.
(I'll post a video related to this ASAP) :-(
Don't forget to use a good SD card (I used sandisk 1GB microSD card and kingston 1GB microSD card, Both works nicely :-) ) and format it with FAT32 file system.
wave file preparation.
You should use following wave file configuration to play with this player.
File type : wave(microsoft)
Wave sample rate : 22,050
Audio bit depth : 8bit
Channels : 1 (Mono)
Create a wave file with these setting and save it to formatted Micro SD card. You can use a audio editing software to create a wave file. Anyway I have uploaded a sample wave clip (soundclip.wav) you can download it here.
Compiling the code
You should have to download and install MPLAB IDE and C30 compiler(MPLAB® C Compiler for dsPIC DSCs). Special free versions for academic use are available here.You can download it for free.
Click below to download.
1. MPLAB IDE
Download the project files here >> Simple dsPIC wave Player password : simpletechtrick
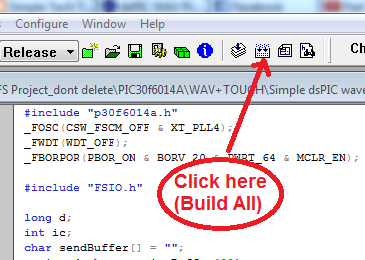
Then extract project files to a folder and open the project by clicking on the "SDcard.mcw" file. see the images below.

Then click the "Build all" button to compile the code.
If there is no errors, you can see the message "BUILD SUCCEEDED" in the Output window. Now go to project folder and you can see a Hex file in the project folder.

Hex file in project folder.

Here i'm using 10MHz crystal in my system with "PLL4" so my system clock runs at 40MHz. All sampling rates and PWM frequency calculations were done according to this clock frequency. If you need to run in different frequency you can change the codes according to your needs.
for a example if you like to use 4Mhz crystal with PLL8, you have to change this line in main.c file 2nd line. (_FOSC(CSW_FSCM_OFF & XT_PLL4);) like below.
_FOSC(CSW_FSCM_OFF & XT_PLL8); // 4X8 = 32MHz
and you have to calculate and change the PR1 value (Timer Period register), see the Line 87 in the main.c file
PR1 = (10000000/WavSRate)-10;
change this line as following.
PR1 = (8000000/WavSRate)-10; // (FOSC/4)/WavSRate-10
and you have to change the Line 72 in hardwareProfile.h file.
// Sample clock speed for a 16-bit processor
#elif defined (__C30__)
#define GetSystemClock() 40000000 //64000000
change like below.
// Sample clock speed for a 16-bit processor
#elif defined (__C30__)
#define GetSystemClock() 32000000 //64000000
and finally change PR2 value in PWM.c file Line28. It look like this PR2 = 300;
You can calculate it like below.
PR2 = fosc(Hz)/(4*PWM frequency(Hz))
in my case it was 300, that mean I set the PWM frequency to 33KHz
PR2 = 40,000,000/4/33000 = 300 (approximately)
for a example if you like to use 4Mhz crystal with PLL8 and set PWM frequency to 33KHz you can calculate your PR2 value like below.
PR2 = 32,000,000/4/33000 = 242(approximately)
There for your code should look like below ( in PWM.c file 28th line)
PR2 = 242;
(I'll upload a youtube video with above figures and complete working project as soon as possible)
Good luck..! :-)
Hi, may I know if I would like to use different PIC, which part should I change? For example I would like to use dsPIC30F4013 with same crystal frequency..Thanks
ReplyDelete